Sunday, August 29, 2010

Sundays with Sparky - Building Lunch

Sadly, the summer was as fleeting as it's ever been, and the school year has begun.  After writing my last post, I decided to take a dose of my own medicine, and created a weekly lunch chart to help Sparky pick what he wanted to pack.  Since I think it's a very appropriate and flexible model, I built a chart based on the USDA Summer Food Service Program's Lunch Meal Pattern.

My chart is pretty easy to emulate, columns for days of the week, and 4 different-colored rows* for: Vegetables, Fruits, Proteins, and Grains.  I then printed little colored cards whose backgrounds corresponded with the columns, labeled with all the different items we rotate through for lunch: I surprised myself by finding our standard repertoire had over 60 items for him to choose from; 15 in each category!  For instance, there are options you are all familiar with: PB&J on sliced bread with a side of grape tomatoes and an orange.  Sometimes, we have more international lunches: Tamago (omelet) sushi with a thermos of miso soup and Inarizushi (rice-stuffed tofu) and kiwi.  There are a couple of vegetarian and even vegan options (so beans could be in both the vegetable and protein categories.) I also offered pasta options, separating the sauces and toppings on the chart to fit them in the appropriate category - so mac and cheese, and spaghetti with Italian sausage and marinara.

Sparky to arranged the cards on the corresponding colored row to create a balanced meal with the following caveat: he could sub vegetables for fruits if he wanted to, but not the other way around, and he couldn't have the same meal or a very similar meal twice in the same week.  He sat down and went to town, and in no time, I had my week AND grocery list planned out, and he had lunches that satisfied both of us!  While allowing Sparky some control, this method is a terrific teaching tool:  he's now aware that food can be categorized in several ways, and that he needs to balance the different categories to create a good meal.

 (*technically, there are 5 components to lunches in the USDA meal planner, but I omitted dairy from my chart under the assumption that most kids, even those who pack, purchase milk at school - and Sparky gets lactose-reduced milk at home with his afterschool snack.)


(this week's menu: Mon - a banana-nutella wrap with bell pepper on the side; Tue - Tamago, Inarizushi, Miso soup and Strawberries; Wed - 7-layer dip with chips, assorted veggies, and watermelon; Thur - Assorted cheese and crackers with grape tomatoes and kiwi; Fri - Tofu and Egg salad on sliced bread with snow peas, and clementines.)  


Wednesday, August 25, 2010

Policy Point Wednesday - Unfamiliar Territory

As any parent knows, most kids dislike anything unfamiliar.  This might be the case for new faces or new places - but, no matter how sociable or adventurous, almost every kid balks at unfamiliar food.  When it comes right down to it, adults aren't really that adventurous, either: the very first Americans nearly starved to death while surrounded by perfectly edible seafood, waiting for more familiar supplies from Europe.  Unfortunately, those of us interested in healthy eating are up against a culture of foods made familiar by advertising, most not really well-suited to a healthy diet.  Kids like them; kid tastes seem immutable, especially in a stressful school setting - so, how can we help our kids opt for the healthy option instead of the familiar "kid" food?

Nutritionist Ellyn Satter talks about repeated, neutral, exposure to foods being key to developing your child's palate.  Exposures can range from just looking at a food (even pictures - think of how your child is affected by magazine advertisements) or as complex as helping to prepare the food.  Some kids are like to know where their food comes from:  check and see if your local zoo or botanic garden offers tours of their edible gardens. When teaching your kids to taste new foods, offer them an out - some nutritionists and parents recommend the "no thank-you bite"; what worked in our household was to wash the distasteful bite down with some water.  It's also important to be matter-of-fact; don't urge a child to eat foods they refuse to try - it may well take 20 exposures before a child will accept a new food; the key is to neither push nor give up. (Keep in mind that all kids are different: some kids have more difficulty than others)

To help reduce the stress of the lunch line, ask your school to offer pictures of the meals they'll be serving,  - make sure your child gets to see what's for lunch the next day the night before or the morning before school.   Ask if teachers can support you by offering a "preview" of lunch - just to look at - in the classroom. Ask your child which items they'll choose (in the Offer Versus Serve system many schools use, children can select any three or more out of the offered five options.) While lunch staff are not allowed to direct children towards or away from any food, you can weigh in by discussing what different foods do for us and why it's good to eat them.  If you're packing a lunch, create a weekly lunch chart designed like the Summer Food Service Program: one protein, two fruit/veg, one dairy, and one whole or enriched grain;  have your child help "design" his or her own lunch ahead of time.  The key is to keep your child involved, prepared and educated, so they gradually learn to make good choices on their own.


*Forgot to add, this post is part of the Lunch Revolution Blog Party (with prizes galore) at Notes from the Cookie Jar and Fed Up With Lunch with Mrs. Q.


Sunday, August 22, 2010

Sundays with Sparky - Dad's Birthday Surprise Part II


086 Continued from last Sunday...  So, we had the cake part of our arrangement...but we were sadly lacking in frosting, something that we had to address somehow.  I decided that we would make Cheesecake Lollipops instead of trying to frost our beautiful chocolate cake pops.

I didn't want to overdo it, so I halved the lollipop recipe - so you can use this version to allay any small but insistent cheesecake cravings you may have in the future; it wasn't a big recipe to begin with.  We preheated our oven to 350, and readied a large sheetcake pan to be the base of our water bath.

Sparky put 1 8oz brick of cream cheese into the Kitchenaid (with our fancy-dancy SideSwipe paddle!) and beat it slowly until it was rich and thick.  Then we added 1/3 cup of sugar, 1 tbsp and 1 tsp of All-Purpose flour, 1/4 tsp vanilla, and 1 egg and whipped it until smooth - and we poured half of this mixture into a tinfoil-lined baking sheet

017(if I had it to do over again, we'd have done this in a regular loaf pan for thicker squares)  Then he added 1 1/2 tsp cocoa powder and 1/2 tsp instant espresso to the remaining batter, and whipped it again until it was uniform in color.  The second batter was poured over the top of the first and swirled in with a spatula.

018Then the whole thing went into the larger pan which we'd set in the oven, and hot water was poured into the larger pan to create a bain-marie.  It baked for about 5 minutes, then was turned down to 325 for another ten minutes, and it set beautifully.  We then allowed it to sit in the warm oven with the door slightly ajar for a half an hour - and then moved the cheesecake directly to the freezer.

054052On to the fruit!  I peeled and cored a pineapple, and cut wedges around the outside to form a flower - and, after sticking a blackberry in the middle, Sparky stabbed it through with a bamboo skewer - we found it was easiest to thread the skewer all the way through from top to bottom, so that skewer wound up with the pointy part down.  We did the same with our other fruits.  He then poked the finished skewers into the Crenshaw melon I had halved for this purpose (sometimes it helps to poke your hole with an unfinished skewer, and then stick the finished one in.)  We cut the cake into slices and then into rounds, skewered them to the arrangement, and did the same with the frozen cheescake we'd cut into squares.

A truly delicious alternative to a birthday cake that Dad really appreciated - and Sparky made him work for it by creating a post-it-note scavenger hunt all over the house that both started and ended at the refrigerator where his arrangement was hiding.  All in all, rousing a success for those of us who had become bored with birthday cake!


Friday, August 20, 2010

The Food Desert Project - Roasted Chickpeas with Homemade Za'atar

013Sometimes, you just really need a simple recipe that doesn't take that much time and energy but really delivers on flavor.  I've found all kinds of roasted-til-crunchy foods really appeal to Sparky: it's the only way I can get him to eat kale or beets.  While we have no trouble eating chickpeas in our household,  I love the recipes we've seen floating around the internet for them as a crunchy snack food.

However, they are kind of bland on their own, and missing the flavors of lemon and tahini that we often associate with chickpeas (the main ingredients in hummus)  I recently stumbled into a discussion of za'atar bread, and realized this was the seasoning I was searching for!   This Middle Eastern spice paste usually contains at minimum sumac, thyme and sesame seeds - but unfortunately, I can say with a fair amount of certainty that sumac is not available in the food desert (it's barely available in grocery stores.) I looked up substitution suggestions and found...lemon pepper!  While it isn't exactly the same, it will give those lemony notes that sumac brings to the party -so, my recipe for food desert za'atar follows:

1 tablespoon each of:
Dried thyme
Lemon pepper seasoning (check and see if yours has salt)
Sesame Seeds
Oregano

Lightly toast the sesame seeds in a nonstick pan for just a moment, then dump all the ingredients in a blender, and blend until everything is finely ground (it will be a bit clumpy because of the oil in the sesame seeds)

018For the roasted chickpeas, drain and rinse a can of chickpeas, and drizzle with EVOO (I do this while they're still in the can.)  Pour onto a cookie sheet and sprinkle with a thick layer of za'atar.   Salt to taste (remembering that your lemon pepper may have salt)  Roast at 450 for 15 minutes or until the chickpeas are crunchy and brown.

Eat as a snack, or add to salads. Nutritional Information
027


Wednesday, August 18, 2010

Policy Point Wednesday - A Prescription for the new Oasis

In some excellent news for Chicago's food desert dwellers, Chicago Mayor Richard M. Daley and Walgreens' Executive Vice President, Mark Wagner, announced a new joint initiative to offer expanded service in 10 food-desert Walgreens sites.  Even better, Walgreens is partnering with Northwestern Medicine and Near North Health Service Corporation to create food "prescriptions" which will educate patients on better food choices.  These Walgreens locations will now offer more than 750 new food items including fresh fruits and vegetables, frozen meats and fish, pasta, rice, beans, eggs, whole grain cereals and other healthy meal components.

Patients at the Komed Holman Health Center, located in Chicago's Kenwood neighborhood on the south side, can go to the Walgreens store at 67th and Stony Island and receive discounts on food items that have been "prescribed" by doctors at the Center.  Komed is part of the Diabetes Collaborative, an effort aimed specifically at reducing diabetes and its concurrent negative health outcomes in underserved minority populations.  The goal of the program, whose success was recognized by Mutual of America in 2009, is to educate its participants in the best way to manage their diabetes, and has been shown to help patients achieve their self-management goals.

Again, if these initiatives are to have any effect on reducing the negative health outcomes of the food desert, it is absolutely crucial that patients not only have an understanding of self-care and good choices - but that they be able to use the resources that are now offered to them.  The USDA has an excellent resource for families: the SNAP-ED recipe finder.  In it, anyone with internet access can research a database of healthy recipes which can be filtered for specific nutritional needs: e.g. calcium-rich, whole-grain, and also for styles of food, availability of cooking equipment, and cost per serving.  Walgreens would do well to offer this free information to the participants in this project, to make sure the good food they're bringing to the desert does not go untasted.


Sunday, August 15, 2010

Sundays with Sparky - Dad's Birthday Surprise Part I

August is birthday month in our household.  Sparky was born just five days after his Dad's birthday, which means that I'm always hard-pressed to find two kinds of cake that will each make both of them happy - and that won't weigh us down in the hottest of the summer months.  I was talking to Sparky about what kind of cake he wanted to make for Dad, when an Edible Arrangements truck just happened to drive past our house.  "Mom, can we buy an Edible Arrangement?"  I looked at him skeptically.  "Son, we can make an edible arrangement - and I bet we can do it better than they can!"  "...But they deliver!" was his feeble response, but he eventually came around to the idea - especially after I suggested that we make cake pops and stick them in with the fruit.

So, we began by making Smitten Kitchen's new "Everyday Chocolate Cake," which seemed like an easy enough cake to make - and had the bonus of being a loaf cake, which we could bake in our toaster oven and not heat up the whole house.  I set Sparky a-cookin': 


1 stick unsalted butter
1 cup packed light brown sugar
1/2 cup granulated sugar
1 large egg
1/2 cup yogurt
1/2 cup milk
1 teaspoon vanilla extract
1 1/2 cups all-purpose flour
3/4 cup cocoa (not dutched) plus more for dusting
1/2 teaspoon baking soda
1/4 teaspoon salt


First, we sprayed the loaf pan with cooking spray and dusted it with cocoa powder.  Then I set Sparky to creaming the butter in our KitchenAid.  He added the sugars and allowed them to incorporate fully, and then added egg, yogurt, milk and vanilla and beat until smooth (if we had followed instructions and had everything at room temp, this would have incorporated better, but it didn't seem to affect the final cake.)  Then, we whisked together the dry ingredients and added them gradually to the batter, incorporating them with a spatula until everything was blended into a thick batter.

This was spread into a standard loaf pan, which we set in our toaster oven (preheated to 325 for about five minutes or so) and turned the timer on for an hour; if we'd been paying attention**, we'd have tested the center for doneness and added another ten minutes to the time.


After cooling, we sliced the cake and then used a cookie cutter to cut out circles, which went onto skewers for Part I of this project.

**Funny story - I had an appointment I'd forgotten about, and realized just after the batter was in the pan that the cake would need to bake while we were gone.  Since the toaster oven shuts itself off, this wasn't really a problem - but I was justifiably nervous about leaving a hot electric oven on in the house by itself, so (imagining the headlines: firefighter arrives on scene to douse conflagration caused by his own birthday cake) I recruited a neighbor to check in on the last 10 minutes and make sure everything was OK.  Unfortunately, this meant that the cake was slightly undercooked, but it was delicious and fudgy and it didn't really matter.

To be continued next Sunday....


Friday, August 13, 2010

The Food Desert Project - Savory Cottage Cheese Tomato Tartlets

When I saw these muffins featured on one of my favorite blogs, 101 Cookbooks, I immediately thought of this project: the recipe didn't seem to need much modification to fit it.  The ingredients make me wonder, though: (the initial recipe was modified from The Vegetarian Supercook, below, but I wasn't able to find where the initial idea came from)  a savory cheese tart with almonds screams Moorish influence to me.  I did a search of Spanish websites for an almond requesón tart (requesón is the Spanish version of ricotta)  and found only sweet versions.  Poring over Moroccan sites, the cheese tarts were similar to what most Americans know as spanakopita, and while there are many chicken dishes with almonds, I found no little tartlet or tart with the same main ingredients of this one.  After making them, while I still wonder about their progeny, but I deeply appreciate their deliciousness and convenience (they are a terrific quick breakfast on-the-go, kind of a cross between a quiche and a souffle.)

At any rate, once you've assembled the ingredients, these are relatively simple to make - I recommend using muffin liners in your pan and spraying the inside with cooking spray; these do stick like there's no tomorrow.  The muffins are excellent warm for breakfast, or cold packed in a lunchbox.

1 cup low fat cottage cheese
3/4 cup parmesan cheese, 1/4 cup reserved for topping
1/4 cup flour
1 cup almonds, ground
1 teaspoon baking powder
1/4 cup sun-dried tomatoes*
1/4 cup minced canned red pepper
1 tbsp olive oil
1 tsp dried basil
1/4 cup water
4 eggs, lightly beaten*
1/2 teaspoon salt

Prepare a medium-size muffin pan with paper baking cups, sprayed well with cooking spray on the inside.  Preheat your oven to 400 degrees.

*If you can't find sun dried tomatoes in oil, do what I did: chop your dried tomatoes finely (or grind them in the blender) and rehydrate with the olive oil for 10 minutes.  (Otherwise, just mince your tomatoes in oil.)

Combine cottage cheese, flour, 1/2 cup of parmesan, flour, ground almonds, baking powder, sun-dried tomatoes, basil, salt and water in a large bowl.  In a separate container, beat the eggs (if you use a product like eggbeaters, this can be a one-bowl recipe*) and then pour them over the first mixture and combine thoroughly.

Pour carefully into 12 muffin cups and top each with some of the remaining parmesan cheese.  Bake for 30-35 minutes until golden brown and set in the middle: cupcakes will rise a bit.  Nutrition information


Wednesday, August 11, 2010

Policy Point Wednesday - If I Ran School Lunch

While we’re all sitting and waiting for Washington DC to decide the fate of school lunch, (and, if you haven’t yet, would you please give your representative in the House a poke? See the links at the bottom*) I thought it would be helpful if we discussed some ways that lunch could improve right now, immediately. I read a lot of blogs about food and nutrition, and one particular post entitled The Chocolate Milk Mistake got me thinking about a fundamental problem in school nutrition programs, a problem we could address right away.

It’s an issue of philosophy, really. School nutritionists, understandably, are most concerned about kids who depend on school lunch and breakfast; those who might not get dinner in the evening or even meals over the weekend. It’s to be expected that their primary focus is to get these kids to eat! In response to this concern, school districts seem to have adopted the philosophy that “a spoonful of sugar makes the medicine go down” (sometimes literally.) Many schools offer foods that meet the USDA standards, disguised as treats and snack foods that appeal to the broadest range of children possible. (This explains the pancakes, cookies, nuggets and nachos.) While this helps with the immediate issue of childhood hunger, we lose ground later as children learn to expect an all-treat diet. Struggling families especially, don’t have the resources to choose a fiber-enriched, vitamin-enhanced snack over one that has no redeeming value at all.

Since schools are institutions of learning, it's reasonable to ask that they offer children a window into appropriate eating. Yes, there are severe roadblocks in the way: the program is underfunded in the extreme, and labor, equipment, and supplies compete with food for the same money – but let’s look at another lunch program funded by the Child Nutrition Act, which I've written about before. The USDA’s Summer Food Service Program can be hosted by any organization willing to take responsibility for running the program (government agencies, churches and other nonprofits, private schools, universities, etc.) The USDA provides training and “meal patterns” which are reasonable and simple to follow: 1 cup of milk, 2 servings of fruit/vegetables, 1 serving of meat/meat alternate, and 1 serving of whole or enriched grains. In general, a lunch might include a white-bread sandwich with lunch meat, a small salad, a piece of fresh fruit, a cup of fruit juice, and a cookie and chips, offered with milk. Yes, there are sugary and salty treats – but neither are an integral part of the main part of the lunch – the protein and vegetables or fruits.

If I could change one thing about school lunch, it would be this: don’t incorporate treats or treat-like foods into the main part of a meal. In my opinion, one sugary and one salty treat per meal are acceptable, but what is most important is that the main focus of the meal be differentiated (no pancakes with cookies, and no nacho cheese dip with chips, etc.) To further communicate the importance of moderation, I think it’s reasonable to ask kids to choose either the sugary treat or sweetened flavored milk. With the exception of the flavored milk rule, this doesn’t require an overhaul of the entire school lunch system, it just follows what’s being done in summer!

While I understand that nutritionists worry about hungry kids, it’s important to allow all kids to develop a healthy food aptitude. Kids need to learn to respond to hunger by eating a balanced meal, and not just to eat because food tastes good. We know children rarely make good choices under pressure - and we know the lunch line is a high-pressure situation, but there are better ways to help ease their anxiety. Parents and teachers can help school nutritionists with lunch, just by showing kids what’s for lunch - even if the kids can’t taste or touch the food during the demonstration. Parents can ask their school districts to provide a photographic menu, so kids can have a concrete idea of what to expect. Both parents and teachers can use their own snack times to let kids open milk cartons and peel oranges; or to show them how to bite into a whole apple - these are all things they need opportunity, practice, and time to learn.

Most importantly, parents need to remember that the most popular lunches will set the tone for the entire menu – so, vote for your school district’s best efforts with your lunch dollars!  If we view school lunch as yet another learning opportunity, I believe we can make a big difference in how kids eat when they become adults.

*Write to your Representative in Washington about the Child Nutrition Act:

Congress.org - one-click to write your own letter to federal or state officials
Slow Food USA Time For Lunch Petition
Bread for the World - Child Nutrition Act Petition
Parents Against Junk Food Petition


Sunday, August 8, 2010

Sundays with Sparky - Grilled Chicken Cordon Bleu

Yes, you read that right - but it's not my fault, I swear!  It's that darn TV and all those ideas it has in it!  You see, we were having a quiet morning - I was relaxing and watching a bit of Food Network, and Sparky was sitting beside me, drawing comics.  Tyler Florence pulled out some prosciutto, and like a cured-ham-retriever on the hunt, Sparky was instantly all ears - nearly in full point at the television set.  "Mom," he said breathlessly "I wanna do THAT!"

What girl could say no?  Besides, I had unused prosciutto sitting in my fridge.  So the next day I went to the grocery store and picked up some boneless, skinless chicken breasts (I'm usually a whole-bird or dark meat kinda gal) and after pricing some gruyere...took a breath and picked up some much cheaper Queso Quesadilla instead (you could use a swiss cheese, too, if your wallet doesn't permit French cheeses.)


So, I assembled our fairly simple mise-en-place: chicken, prosciutto, and shredded cheese, and then called him over.  We'd seen Tyler using a meat mallet to flatten the plastic-wrapped chicken, but for even more protection, and to keep the mess at a minimum,  I opted for plastic wrap inside a heavy ziploc, and a small heavy saucepan -
the larger your "hammer," the less likely you are to tear the meat, and keeping the cutlet whole is important. I let Sparky go to town and he pretty much figured it out himself right away - the only thing to remember is that chicken breasts have a "thin" part (the pointy part) and a "thick" part (rounded) and you need to adjust your whamming accordingly.  After a short while we had a somewhat gargantuan, well-flattened piece of meat (it's also important to note - chicken breast has an "inside-" the side that was cut off the bone, and an "outside-" the side that was under the skin.  It's not crucial, but it's better if the "outside" is up when you are flattening.)


I will say, our cooking projects had never attracted attention in the neighborhood before - but since our kitchen table is next to a picture window right by the sidewalk, passers-by kept shooting us a quizzical look as they saw Sparky brandishing my smallest saucepan and whacking the $^% out of something they couldn't see. (I hope they didn't think it was our dog!)  I was no help, I flinched with each blow - but pounded out is what I asked for, and pounded out is what we got!

After we decided that the meat was pounded to an even thickness throughout, the chicken breasts were turned "outside" down, and then covered in a thin layer of prosciutto.  A small line of shredded cheese went down the middle, and then they were rolled up like maki.  Sparky made a "sausage" using the plastic wrap as casing, and into the fridge they went until we were ready to cook them.


I then had Sparky help me with our side dishes: he trimmed wax beans which I sauteed, szechuan-style, with caramelized shallots, sesame oil and soy sauce, and cut up potatoes, red onions, and garlic which we drizzled with olive oil and stuck on the grill in a cast-iron skillet next to the chicken, where Dad helped us finish up the cooking.

Since I'm not yet comfortable with Sparky using the grill, I took over from him at this point - after bringing out the chicken from its rest in the fridge, I decided to "sew" up the opening in the chicken breast with skewers to replace the "glue" of fried batter the typical recipe uses (toothpicks would have worked better.)  I then seasoned and oiled the outside well, and Dad put them on indirect heat on our grill for about 20 minutes, until they no longer had any "give" when you sqeezed them with tongs (don't squeeze so hard you lose your filling, though!)

They came out delicious, much healthier than their fried cousins, and just as tasty - some of the prosciutto crisped up and had a bacony quality, and some stayed nice and hammy.

Friday, August 6, 2010

The Food Desert Project - Chilled Carrot Soup with Pistachios

Just because you live in a food desert doesn't mean you can't offer your family haute cuisine.  I had been making this recipe for a delicious chilled carrot soup all summer.  One afternoon I realized that the recipe depends on well-cooked carrots, so canned carrots would work just fine - and, with some other substitutions to fit the parameters of this project, came up with this equally delicious version.  Chilled soups can often be one-note and boring: in this soup, the sweetness of the carrots balances the spicy notes from the curry powder and the cayenne pepper, and the sour cream and salty nuts have your palate firing in all four flavor areas.

3 tablespoons dried minced onion
1 tsp granulated onion
1/2 tsp granulated garlic
1/2 tsp ground ginger
1/4 cup white wine
1 tbsp EVOO

2 14.5 oz cans of carrots, drained
1/2 tsp red curry powder
1/8 tsp cayenne pepper, or to taste
1/4 tsp salt or to taste
2-4 cups of water

Shelled pistachios and sour cream for garnish (or sub a similar nut, such as cashews or macadamias; I often use lowfat sour cream or strained yogurt)

Soak the first four ingredients in the white wine overnight in the refrigerator.  Drain, reserving the liquid. Saute the mixture in the EVOO until fragrant.  Add remaining ingredients except water and saute for a few minutes until the flavors blend.
Add half the water, and blend with an immersion blender or pour the entire recipe into a standing blender and blend until smooth.  Add remaining water, 1/4 cup at a time, blending after each addition, until desired consistency is reached.  Pour into a pitcher and place in the refrigerator until thoroughly chilled.

To serve, pour into chilled serving dishes, and garnish with a dollop of sour cream and a sprinkling of pistachios.  Serves 6.  Nutritional Information


Wednesday, August 4, 2010

Policy Point Wednesday - Energy-efficient cooking

An oft-overlooked issue in addressing the needs of the food desert is the cost of the actual cooking - the energy costs, that is.  Cooks not only need to spend time in the kitchen, but expend energy there - and that energy translates into dollars.

The US Department of Energy has a whole blog on saving energy, and this post has many suggestions on how to save energy in the kitchen.   First, match your cooking vessel to the size of your burner and make sure it touches the burner to get good conduction of heat; heavy pots and pans will conduct heat more efficiently, too.  Second, keep a lid on your pots and don't peek (I use glass-lidded cookware for this reason!) In summertime, they suggest using small appliances to cook food - toaster ovens, crock-pots, and microwave ovens.  Avoid using the oven in summer, (and when using it in winter, adjust your thermostat to compensate!) use the stove-top instead; a pressure-cooker will save even more energy - and, of course, summertime grilling keeps the heat outdoors where it belongs.

A couple of techniques will help you save energy regardless of the time of year.  Maintain your large appliances: vacuum the coils on your refrigerator regularly, and check the seal on the door by trying to slip a dollar bill under it (if it slides out easily, replace the seal.) The seal on your oven needs to be checked as well, and keeping your oven and stove burners clean will also save you energy.


Sunday, August 1, 2010

Sundays with Sparky - Crusty Bread, Part II - Meet Bobs

Meet Bobs the Blob, named so by Sparky (he's plural because he contains millions of yeast organisms.) Bobs is our sourdough starter - the beginnings of which was generously given to us by my gifted-baker neighbor, Bernard.

I'd realized two things early on in our early bread-baking forays: 1) I love white-flour crusty breads so much that if we ate them at every meal, I was going to need all new pants, and 2) the most expensive part of baking bread is the yeast, and we were running through it like it was water, especially using the recipe I posted last week.  While I was fortunate to have a neighbor - who does everything from scratch (including grinding his own grain) - to beg starter from, making homemade starter isn't that difficult.  It's better to start with whole grains, the beasties seem to like them better - and easiest if you start with a bit of yeast, though even easier to buy a fully-started sourdough starter via mail.

So, Sparky's bit in this recipe is caring for this new living pet.  Live yeast requires care and feeding and maybe even a bit of love - so  Sparky promptly christened our starter and watched it grow and bubble and eat.  Bobs, while he are growing, lives on the counter in a Tupperware.  I've found that Atta flour is a great help in addressing the white-flour issues listed above - so when we are re-starting, Bobs gets fed a couple spoonfuls of Atta flour, along with enough warm water to make him soupy and this amount is doubled every day until we have slightly more than a cupful of Bobs.  The simplest way to do this is add the water and flour, tightly close the lid, shake until it's completely combined, and then uncover (remember, the little guys need to breathe!)  Between breads, the remaining bit is fed some flour and water, and sits on the counter while we're making bread - and then goes to live, lightly covered, in the fridge for up to a week or so.  I'm told that if you're planning a long vacation, you can freeze your starter...I'm still waiting for that long vacation to happen, though!

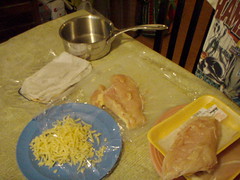
Most breadmakers are real bakers, who measure everything to the quarter-gram - but I wanted Sparky to know that I think it's really a much more visceral operation: you need to know what a dough looks like, feels like, and acts like.  Once we have a cupful of nicely frothy starter, I dump that into my Kitchenaid mixer and start throwing in flour, usually a combination of Atta or Chapati flour, white flour, and a bit of vital wheat gluten (like around 2 tbsp) and a bit of salt (you won't need as much as with conventional bread, the starter gives a lot of flavor; I usually add 1/2 tsp per loaf) either until it absorbs all the liquid from the starter, or I'll add water as well until I have the volume of dough I want (you can approximate by remembering that bread doubles in size - and the dough is just as freezable as the starter.)  When the dough has reached the texture I like - not too sticky, not crumbly-dry but holding together well,  we allow the Kitchenaid to knead it for a minimum of ten minutes.  You can change the dough by adding either water or flour at this point - here are some examples:

Needs water:

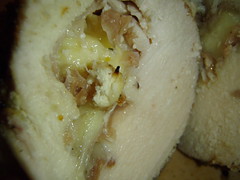
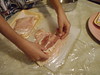
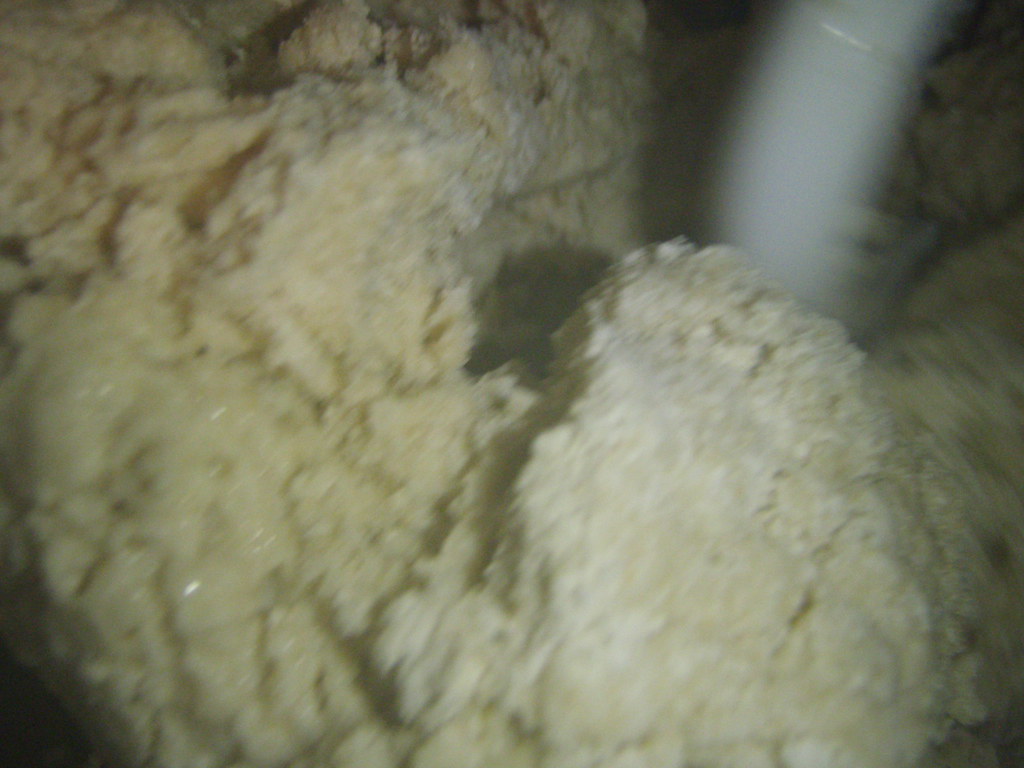
Needs flour (sorry the photo is blurry, but note the solidly wet part underneath.  At this point, I'd let it mix to make sure the dry part is completely absorbed, but I'd guess it will still come out too wet)


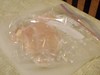
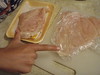
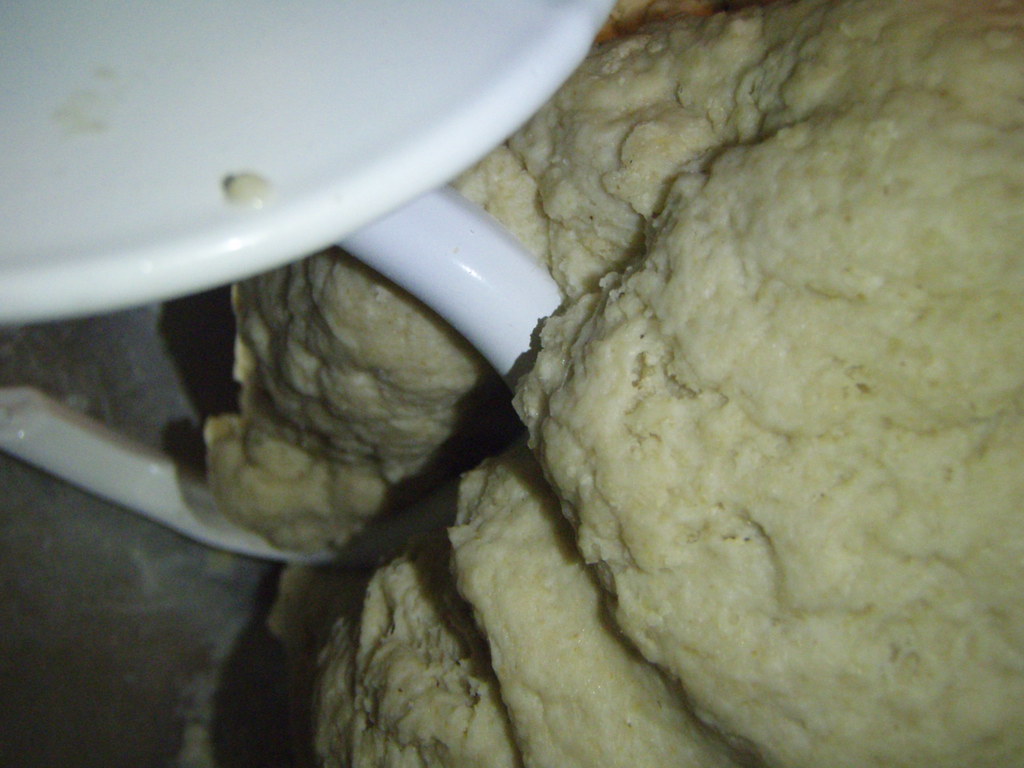
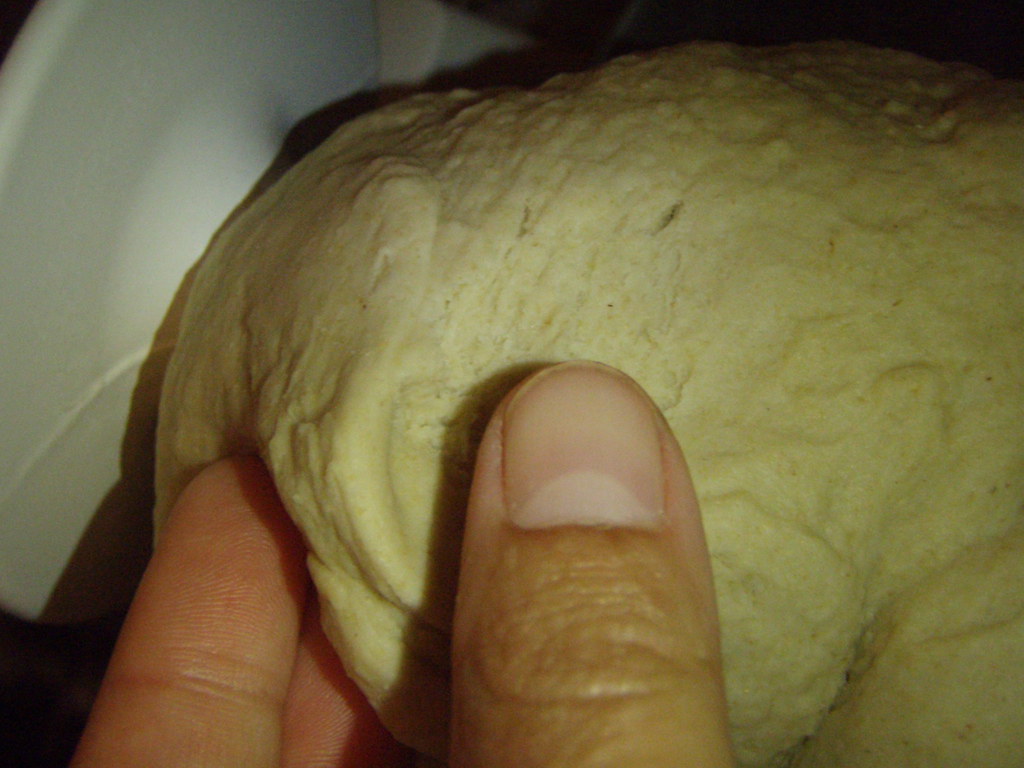
Lookin' good!  The texture of the dough is what's most important; it should come together in a nice ball as shown:


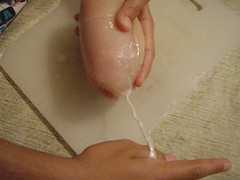
After ten minutes of kneading, the dough will get almost shiny and smooth, and you'll be able to pinch it between your fingers without it wanting to stick to you - and when you pull it a bit it will spring back a bit:


Then you dump the dough into a bowl and cover it with a damp cloth.  Sourdough usually takes all day to rise, about 8 hours - although many people like to put it in the fridge and allow it to rise slowly for up to 24 (this will result in a more sour bread)  I like putting mine in a bowl with measurements, because it's ready to be shaped when it doubles in size.


After that point, you divide and shape the dough as directed in last week's recipe, allowing it to rise (again, it takes longer with a starter - give yourself a couple hours) until it is doubled in volume again - word to the wise: breads whose final rise is too short will "blow out" the side and won't retain their shape - but they eat just as well!   Shape your bread (pull the outside around into the bottom, pinching the excess together until you have a nice round shape.  Put on a prepared baking sheet, and cut a few expansion slits in the top.)  I usually do this second rise over a bit of cornmeal on the sheet I'll be baking them on - be generous with the cornmeal, or your bread will stick (cornmeal over parchment paper is even better)

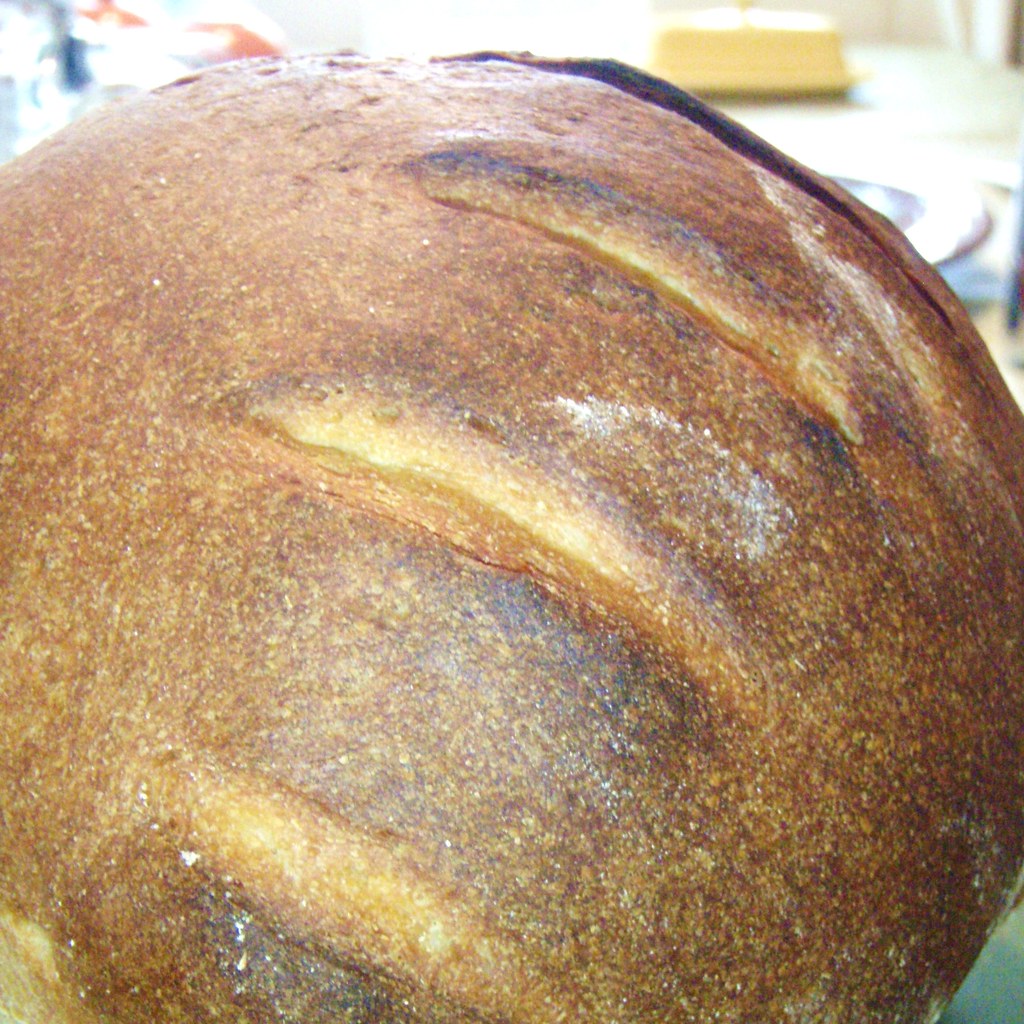
While your bread is rising, you can prepare your oven: you'll need two racks: the upper one is where the bread will go, and should be near the top of the oven - but not so close that your bread is in danger of touching it when it rises.  The second should be near the bottom, and put in a metal pan (I use the bottom of an old broiling pan) filled with water.  Preheat your oven to 450, and when it's up to temperature and your bread is ready, throw it in there for about half an hour.  You should be rewarded with a lovely, crusty loaf like this: