Sunday, May 30, 2010

Sundays with Sparky - Warm Banana Bread

Nothing says lazy weekend like a slice of banana bread for breakfast - the most difficult part about it is waiting for your bread to come out of the oven!  We like a dense banana bread heavy on the bananas and a little rustic - so we add a secret ingredient: oatmeal.  The pictured bread was made with rolled oats, although typically we use quick oats which incorporate into the bread a little bit better - use whatever you have on hand.


Sparky goes hot and cold on bananas, so I'm forever sticking the unwanted ones into the freezer before they head south.  When I have a small collection, banana bread it is! Don't be scared - the peels on your frozen bananas will be black, but the pulp is fine.  Frozen bananas aren't going to leave chunks in your bread, and they do exude more liquid than their fresh counterparts - it isn't a bad idea to allow them to drain in a colander as they thaw.  Don't throw away the liquid, though!  Just reduce the amount of yogurt in the recipe (this works particularly well if you use a strained, greek-style yogurt) by pouring the banana liquid into the measuring cup first, then topping with the yogurt. 

1 1/2 cups  flour
1/2 cups oatmeal (if using old-fashioned oats, you may want to toss them in the blender and grind them up a bit)
1 1/4 cups walnuts
3/4 cup brown sugar
3/4 tsp baking soda
1/2 tsp salt
3 - 4 large bananas, mashed well (about 1 1/2 - 1 3/4 cups)
1/4 cup plain yogurt (or banana juice and yogurt to make 1/4 cup - use Greek yogurt if you have a lot of juice)
2 large eggs, beaten lightly
3/4 stick unsalted butter, melted and cooled
1 teaspoon vanilla extract

While I set the oven to preheat to 350, I had Sparky twist each whole walnut between his fingers to "chop" it, then he scattered them on a baking sheet.  I put them in the oven to toast as it preheated (for about 5 minutes - don't burn them!)  Take them out as soon as you smell warm nuttiness and allow them to cool.  We then got out our standard loaf pan, sprayed it with cooking spray and set it aside as we prepared the rest of our ingredients.

We measured the dry ingredients into a large bowl: flour, oats, sugar, baking soda, and salt in a large bowl, mixed them well with the walnuts, and set it aside. The remaning ingredients were mixed in a medium bowl until well blended. Then Sparky carefully combined the two mixtures so as not to awaken the gluten in the flour - he mixed only until there were no white clumps and we had a beautiful lumpy batter, which we poured into the loaf pan.


After 50 minutes, I poked it in the center with a skewer - we let it cook until the skewer came clean.  Then we let it rest for about 5 minutes, and turned out the loaf onto a plate. Delicious!


Friday, May 28, 2010

The Food Desert Project - Empanadas De Atun - Latin-style tuna fish turnovers

I'd been thinking about making baked empanadas (which we often keep in the freezer for fishing trips; they usually unfreeze by lunchtime and are easy to eat with icky fingers) and I realized suddenly that they might fit the parameters here. So, off to the internets for a little background, as my mother's recipe was somehow absent from my recipe book, and, searching in Spanish, I come across a recipe entitled "Empanadas de Cerveza." Instantly, my mind is swirling with the sensation of pastry exploding in your mouth with a gush of foam, like soup dumplings but with Modelo Especial...or of an eggy, beery, dessert custard...I'd be the toast of Chicago, of Firehouses everywhere.......Sadly, after google-translating the recipe three or four times, I realize it's beer pastry you can fill however you like (what threw me was the ingredient ROYAL{sic} which is apparently a Latin brand-name baking powder and not a custard)

Still, beer pastry seemed like a good idea, but I needed at least one filling without ground meat (although many food deserts do offer frozen ground beef patties, and I'll include the recipe for the ground beef filling I grew up with, sometimes called pino in South America or picadillo in Mexico - but my mother's Argentine version includes hard boiled eggs as well as raisins and olives)  I thought of spinach, or ham and cheese, both common fillings - but I wanted something more.  I finally stumbled across Empanadas de Atun, or Tuna fish turnovers, which immediately piqued my interest.  (I also stumbled onto an amusing 12-page argument about the correct translation of "empanada" into American English: turnover? pie? pasty?)

The Argentine empanadas I grew up with trace their history to the Empanada Gallega or Galician Turnover - a (usually) codfish pie that was the hallmark of the Celt-influenced northwest corner of Spain.  Often, the individual versions of these savory pies are historically linked to the Cornish Pasty; but considering the ingredients and method, I think it's more likely that Latins copied the size and shape of the convenient handheld Pasties and retained the recipes' otherwise Spanish roots.  Still, in many other ways this recipe shows off the incestuous relationships of international foods - note the similarities between the recipe below and this one.

So, I offer several options, all beginning with -

Masa de Cerveza: Beer pastry (Traditional Galician empanadas use olive oil and wine in the same proportions as beer and oil below)
1 cup of beer
1 cup of oil
4 1/2 - 5 cups of flour
1 tsp salt

Mix beer, oil, salt and add flour until a soft, but not sticky, dough forms. Let stand while preparing filling.


Empanadas De Atun
2 6-oz cans tuna
2 hardboiled eggs
4 slices Bacon (because Argentines like a little extra protein with their meat)
2 tbsp dried minced onion, rehydrated in 1/4 cup wine
2 tsp minced garlic
1/2 jar roasted red pepper, chopped
1/2 cup chopped green olives with pimiento
Tomato sauce to moisten
Egg wash or oil

Fry the bacon until rendered, drain fat to taste - add chopped onion, garlic and pepper and fry until fragrant. Remove from heat, mix in a bowl with tuna, tomato sauce and chopped hardboiled eggs.

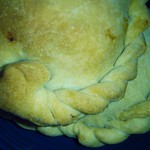
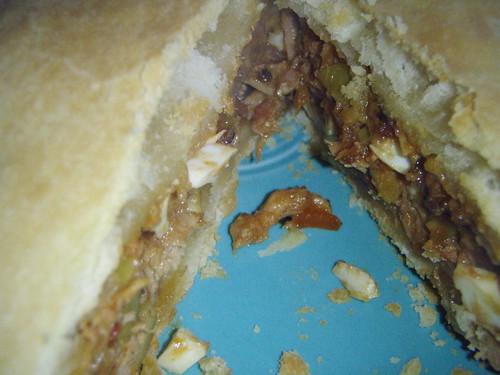
Gallega-style:  Divide dough into four parts.  Form each part into a ball, and roll out two balls into a disk about 1/4 inch thick, slightly larger than a dinner plate.  Place one round on cookie sheet, and top with half of your filling, spread out, leaving a 1" edge (an aesthetic change I'd make next time: reserve the olives and eggs, slice them, and put them on the pastry in separate layers with the tuna mixture in between)


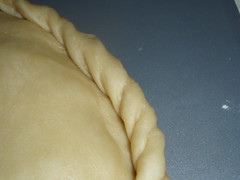
Top with second pastry round and crimp the edge all the way around by pinching it between your finger and thumb, rolling the pinched part inwards and pinching again

.


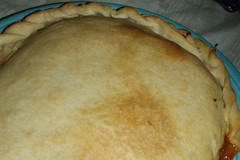
Paint with a little oil or egg wash (this isn't crucial, truthfully, I forgot it - but you'll get a more lovely golden-brown crackly looking exterior.)  Bake at 400 degrees for 1/2 hour until pastry is golden brown and delicious.


Cut into wedges and serve warm.  Makes 2 Empanadas Gallegas, or 1 large and 4 individual: serves about 8. Nutritional Information.
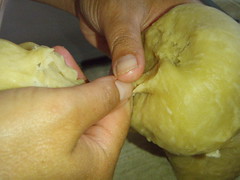
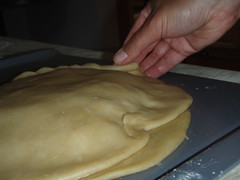
To make individual empanadas, divide your remaining dough balls in half again (one recipe makes 8 empanadas,) roll them into dessert-plate sized disks (or use a tortilla press) and fill the center with tuna mixture.


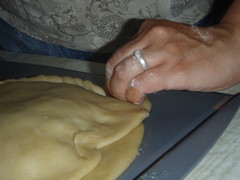
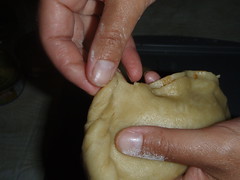
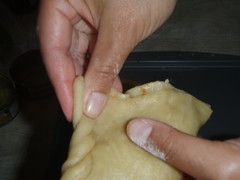
Pull both sides to meet at the top, and crimp as shown here. Place on a cookie sheet and bake as directed for Gallegas.

Other empanada fillings (follow dough and filling directions for individual empanadas above):

Creamed spinach
1 1/2 cups of chopped spinach (frozen would be better than canned)
3 tablespoons of shredded mozzarella
1/4 cup of chopped olives
3/4 cup white sauce*
2 chopped hardboiled eggs
salt, pepper and nutmeg to taste

Mix ingredients together and stuff empanadas.  (Note: it's easier to get wet fillings into an empanada if you use a dough press, like those linked below)

* White sauce - fry 3 tbsp of flour in 3 tbsp butter until fragrant, add 1 cup milk and bring to a boil until thickened.

Ham and cheese (layer the ham of your choice and cheese of your choice, just that simple)

Pumpkin (use 1 can sweetened canned pumpkin pie mix straight-up, or for a firmer filling, combine it thoroughly with 2 eggs and 2/3 cup of evaporated milk.  You can also use a can of plain pumpkin, add 2 eggs, seasoning of your choice, and 2/3 cup of sweetened condensed milk)

Pino or Picadillo

2 tbsp dried minced onion, rehydrated in 1/4 cup wine
1 tsp minced Garlic
Ground beef  1 lb
Paprika  1 Tbsp
Ground Cumin 1 tsp
Oregano  1 tsp
Water or stock  1 cup
Flour  1 Tbsp
Raisins (opt.)  1/2 cup
Olives, green (opt.) pitted, chopped 1/4 cup
2 chopped hardboiled eggs.

Fry the onion and garlic in the oil in a heavy skillet.  Add ground beef; after the fat has rendered, drain, reserving fat.  Sprinkle the flour over and seasonings, fry briefly until fragrant.  Add water or stock, raisins, olives, and cook for a few minutes - the beef should be fragrant and saucy, with a red hue from the paprika -add back some fat if it's too dry.  Cool slightly and add the chopped hardboiled eggs.  Stuff into empanada pastry.


Wednesday, May 26, 2010

Policy Point Wednesday - Summer Lunch Program

Many families in the US suffer during the summer because they lose the safety net of free and reduced school meals.  They may not be aware that the USDA has a somewhat simpler program to bridge the summer months.  The Summer Food Service Program is provided in areas where 50% or more children living in the area qualify for free and reduced lunch, and may be housed at any location where children gather, such as a park, church, migrant camp, or school.  It eliminates paperwork by providing free lunches to all children under age 18.  (Admission-based programs may also recieve reimbursement for meals, but only for the children who qualify.) 

This program can provide up to two full meals in a day, of the site's choosing: e.g. breakfast and lunch, lunch and snack, breakfast and dinner (under the USDA guidelines, a program cannot serve lunch and dinner.)  All meals served through the Summer Food Service Program must meet USDA nutritional guidelines and must include: 1 serving of milk, 2 servings of fruits and/or vegetables, 1 serving of grains, and 1 serving of protein. 

Unfortunately, the Summer Food Service Program isn't reaching as many children as it should.  15 million children depend on free and reduced-price meals at school, but only 2 million receive the free meals provided by the summer program.  The USDA states that "the primary reason for the limited access to the program is that there are not enough feeding sites." Letsmove.gov states "Passionate community and faith leaders ensure there are meal sites in parks, schools, camps, places of faith and other locations nationwide that provide educational and nutritional meals to children to foster healthier lifestyles. However, the need is great and we need your help!"

You don't need to be a school or a municipality to host a summer lunch site - there are resources available to anyone who wants to start a program - besides the USDA and individual State agencies, the ERS offers a map where you can check if your area is eligible for a site.  The Food Resource and Action Center (FRAC) offers a free sample menu, and Second Harvest Heartland provides a pdf Summer Food Service Program toolkit.

Sunday, May 23, 2010

Sundays with Sparky - Sparky's excellent Strawberry Adventure

One of my favorite things to do with Sparky is to pack the family in the car and look for a food adventure: finding out where food comes from, be it the farm or a grocery store, or even a new kind of restaurant is an important way to learn about food.  This particular adventure happened a while back, but I thought I'd post it today because strawberry-picking season has just begun.  It was the impetus for me to create a Chicago-area U-Pick map on the sidebar of my blog.

On our own for an afternoon, I decided to take advantage of the unseasonably cool weather and find us some strawberries right off the plant. As the pickin's up North were slim, we opted to head southwest to Indiana. I don’t like to drive on highways on a good day – but especially so on a beautiful cool summer day when the alternatives are so wonderful. Therefore, we opted to take the first course of the Lake Michigan Circle Tour, and followed Lakeshore Drive through to 41 to 12/20, Indianapolis Boulevard, through to Highland, IN. Though I’ve driven this route previously, I had forgotten the beauty of the parks and marinas south of Hyde Park.

So, after a fairly short drive, we found ourselves in Highland, at Johnsen’s Blue Top Drive-In, one of the last of a dying breed that is probably no more.  Sparky loved the kitsch of the place (not to mention the vintage Star Wars pinball machine inside) and, as it was windy, we opted to eat inside the car. He actually made our young waitress blush by shouting, sparky voce (an antonym for sotto voce) “The service in this place is GR-EAT!” and, after the appetite increase from channeling Tony the Tiger, dug in with abandon to a nicely charred hot dog, seasoned fries, sherbet and a Green River soda. I ordered a pork tenderloin sandwich, a very nice rendition- breading a bit heavy for perfection, but still quite good.

After a nice lunch, we turned the corner onto Ridge Ave (or Rt.6) and drove for about 8 miles to Johnson’s Strawberry Farm in Hobart. (feel free to insert your favorite double-entendre about Johnsons here) Johnson’s is a large restaurant/farmstand/garden center and at first I was concerned we’d be headed into a farm disfigured by corn mazes and pony rides, but that was fortunately not to be.

The farmstand at the moment had, of course, strawberries and a few other local products, along with a few veggies like tomatoes and zucchini. The garden center put ours to shame, with a whole series of little “rooms” with fountains and animal topiaries – but of particular interest was a large section of herb plants, in particular a large variety of basil, including two different varieties of Thai basil.

We explored the stand and adjacent bakery a bit (I was a bit disillusioned by the strawberry pie: it was the glazed strawberry kind, of which I am not a fan – though, a few of the other pies looked promising.) I asked where the U-Pick area was, and was given directions that went something like: drive out back past the white barn, over the river and through the woods…we passed a field of pumpkin plants, some raspberries and some sweet corn, tomatoes and peppers which are probably waiting their turn for U-Pick. Driving around the corner, we came upon the requisite handmade sign, and another, offering the 6 gallons-for-the-price-of-5 deal.   It was busy, even for a Wednesday - I can't imagine what the weekends must be like.

Sparky and I had a fabulous time picking our two gallon’s worth and having bruised-strawberry wars - nothing like collecting more delicious red berries than you can eat right off the vine - from a sitting position.

I packed our booty in a cooler I’d brought for that purpose, and we headed directly North to Gary – the closest beach, at Marquette Park. This experience was an education, to say the least. The park is beautiful; old art-deco statues and park buildings have been lovingly maintained - there’s a large playlot right by the beach with a lot of quite new equipment. The beach itself has, albeit in the distance, one of the best views of the Chicago skyline available without venturing onto the lake itself.

That being said, you can’t help feel that the remainder of the skyline must weigh heavy on the citizens of Gary: on either side of the beach, stretching almost as far as the eye can see, are the factories that can be seen from the highway as well, curved like smoke-fingered arms reaching around to pull you in. Though they’re miles away, their presence alone makes the beach claustrophobic. It’s a grim reminder that the pristine Chicago lakefront comes at a price, paid for us by the citizens of Indiana. I commend the City of Gary for keeping up the lakefront park so well, despite this unavoidable reminder of the symbiosis between their City and this giant, unlovely, pragmatic behemoth.

Fortunately, all of this was lost on Sparky, who just likes to play in the sand.


Back on the road, we ended our day at Spring World, a Yunnanese restaurant in Chicago's Chinatown. One of the adventures in ethnic eating is sometimes convincing your waitress to give you what you ordered.  They have a delicious tripe dish, but in order to convince my waitress that I knew what tripe was,  I finally resorted to drawing a spiral on my stomach with my finger, nodding and saying “tripe, yes!” (which fortunately was received well.) Sparky and I also ate excellent lamb brochettes with cumin, chive dumplings, tofu “french fries” and crispy duck.   All of it was excellent and very welcome after such a long and tiring day.

What was the highlight of this extremely busy and adventurous day? Well, for me at least, it was driving home to the sweet tune of Sparky reading recipes aloud and planning future meals from Roald Dahl's cookbook, Revolting Recipes.

Wednesday, May 19, 2010

Policy Point Wednesday - Marketing Health

Most of the snacks in the food desert have two things in common:  one - they're ready-to-eat, and two - they're shelf-stable.  Considering that purveyors have limited shelf space that can't be wasted on a gamble, it's understandable that these two criterion drive most of the "fringe food" choices.  Unfortunately, to make a food both ready to eat and shelf-stable requires some manipulation; sugar, fat, and salt are common preservatives.  A steady diet of foods manipulated to maximize profit and minimize loss rather than to maximize health and minimize disease is the root cause of many negative health issues in the food desert.

Recently, I became concerned about another trend: the marketing of "healthy" foods preserved in the same manner as fringe foods.  Right now, parents everywhere - even in the food desert - are opting for foods that make health claims on the label: companies imply that their packaged are good or better choices with a number of new labeling systems.   Unfortunately, more often than not, the foods themselves are still salty, fatty, sugary fringe foods.   For instance, you may have noticed many sugar candies now positioning themselves as fat-free - a claim that, while true, doesn't make the sugary snacks a nutritious choice. There's a wide range of opinions about organics, but whatever you think of them, some organics are offered in fatty, heavily-sugared, heavily-salted forms that are not significantly better than conventional chips. 

To an educated consumer, these distinctions are easy to make: we all know that a bowl of brown rice is going to be better for you than even the healthiest fried chips - but to the uneducated consumer, health claims on a food label have serious implications.  I have firsthand experience seeing well-meaning parents offer sugary, fatty canned nutritional shakes, or worse,  rehydration solution,  only because the labels state that the products are approved by pediatricians.  A label-reading parent would see that the "clinically-proven" milkshake has about 4 times the fat, twice the sugar, and less protein compared to milk, and the "pediatrician-recommended" rehydration solution is basically salty sugar water.  Both exist to address very specific medical conditions, and should not be offered as food.  However, while rehydration solution is offered in the drug section of the store, and specifically states it should be offered "at the first sign of dehydration and vomiting,"  nutritional shakes are often shelved with foods, and state that they can be used to address the nutritional needs of "picky eaters" - which is incredibly ambiguous (heck, even my own child is picky at times.)  These two disparate examples show how difficult it can be for parents to make good choices if they don't have the resources to understand the labels.  While part of the solution is addressing how food is marketed, educating parents remains the most critical need in the food desert.

Sunday, May 16, 2010

Sundays with Sparky—RAW

Cooked food does divorce us from the reality of what we’re eating, especially meat.  It’s a little harder to separate yourself from something that has bones you can find in your own body. I didn’t think this would be an issue for Sparky, as Chinatown—with its whole cooked ducks and chickens—is one of our favorite adventures, but I underestimated how challenging meat can be, up-close and personal. Sparky was a trooper, though, and made it all the way through the process.

Seeing that Sparky felt a little trepidation about cutting up meat, I read him a legend of why Cherokee hunters thank the animals they must kill; he told me he felt "mean" cutting up a chicken.  We talked about it a little more, and finally I asked if he thought it would be wasteful not to eat the chicken now that it's been slaughtered.  He agreed.  The teachable moments of life often wind up in the kitchen.

For this project, we used Cornish hens, as their bones are soft and easy to break when necessary. The first hen, we spatchcocked to be cooked "under a brick."   We got out our tools for the job: a stout pair of kitchen shears and a sharp, heavy knife. Spatchcocking is simple—you cut through the ribs on either side of the backbone (on either side of the “pope’s nose” or little tail, which Sparky used as a convenient handle) and then tuck the legs and wings flat.  Then you score the breastbone with a knife, and crack it with the palm of your hand so the breast lies flat.

The second bird we cut up in the traditional manner you see in American grocery stores (Chinese-style goes a few steps further.) This meant we started by removing the backbone as above (and saved it, along with the first one, for chicken stock) and then, instead of simply cracking the breastbone, we snipped the full length of it with our trusty shears.

This gave us two half-chickens. Next, we removed the leg—holding it away from the body so that gravity spreads the joint, Sparky used the shears to cut the skin and flesh around the joint, starting at the “armpit.” Then, we cracked the joint backwards and cut the few bits of tissue that remained.

We repeated the process at the large joint of the wing. After these were removed, it was a simple matter to turn over the remaining piece and disjoint the thigh from the breast; when that joint is separated, there’s just a small strip of skin and ribs to cut through, and your half-chicken is now chicken parts: thigh, backbone, breast, leg and wing.

Both chickens were rubbed thoroughly with a paste of chopped herbs, salt, oil, and some minced garlic.


The spatchcocked chicken was placed, skin side down, on a preheated griddle. A preheated cast-iron casserole was set on top (this is a job for an adult) to weigh it down. The bird cooked for about 7 minutes on one side, was flipped, and then cooked for another 7 minutes—it’s a quick, if a bit smoky, way to cook a whole bird (this method works very well outdoors on a grill if you don't have good ventilation in your kitchen or are bothered by those pesky smoke alarms.)

The cut-up chicken was put in a heated cast-iron skillet (cast iron and chicken were made for each other) and put into a 400 degree oven for about 10 minutes. After that time, using a really good potholder, they were moved to the broiler for about 5 minutes to crisp up—chicken parts are done when the juices begin to crystallize and brown in the pan. Keep in mind that cast iron heats up and stays hot for a long time; don’t burn yourself.


Our chicken project turned out delicious, crispy-skinned chicken: the spatchcocked bird had terrific flavor because the seasonings were driven into the meat by the weight; although the skin was crispy, the roasted/broiled chicken won the crispy contest—but both had moist, flavorful meat.  Sparky enjoyed the meal as much as I did, possibly a bit more because he'd really put effort into it.

Wednesday, May 12, 2010

Policy Point Wednesday - Their Food Desert like the Garden...


You may recall from my earlier blog post, Acronym Soup in the Food Desert, that the Federal government provides nutrition assistance to needy families through the SNAP program, administered by the USDA.  What many people don't know is that SNAP dollars can be used to purchase "seeds and plants that produce food", and this small fact can make a huge difference for families living in the Food Desert.  Unfortunately, most SNAP families and retailers don't know about this aspect of the program, so they don't have the opportunity to take advantage of it.

How can food desert dwellers, who most likely live in apartment buildings, take advantage of growing their own vegetables?  Well, beyond the standard comunity garden, there are a number of ways to grow food in an urban environment.  Chicago's Green Roof Growers use sub-irrigated planters (which can be made from foodsafe buckets or even used soda bottles at very low cost)  that takes advantage of the unique urban architecture in Chicago - a nearly pest-free environment that capitalizes on our bright Midwestern sun.  In Los Angeles, the Food Chain project is building "edible walls;" vertical vegetable gardens that support and are supported by underserved urban communities.  Window Farms and Vertical Earth Gardens create hydroponic urban microfarms using recycled and easily-accessible materials.

Unfortunately, the SNAP program does not cover any materials - dirt, fertilizer, etc. - so the food desert dweller needs to be especially resourceful (suggesting to your retailer that they offer seedlings in pots large enough to grow into would be the best answer.)  Unfortunately, dirt from outside often isn't a good choice for a potted plant for a number of reasons. Soiless potting mix is preferred, but Coconut Coir, available online in compressed-brick form, is an inexpensive solution to this problem - it can be combined with Perlite or Vermiculite to make soilless potting mix, but it requires the purchase of fertilizer. Outside fertilization can be accomplished through composting plant-based kitchen waste at home, or through homemade fertilizers - one solution listed there that we use at home: we keep a couple of fish in a goldfish bowl; every time we change the water, we use the wastewater on our houseplants and vegetables - a terrific multipurpose fertilizer.

While indoor fruiting plants such as tomatoes and peppers require a seasoned gardener with a lot of experience, even a beginner can plant a cut-and-come-again pot of leafy salad greens.  A small initial investment in containers (again, used soda bottles or even a sturdy plastic baggie will work) soil, seeds, and a sunny window (or even a flourescent bulb) will offer a season's worth of salads.  Salad greens prefer a slightly acidic environment, and so will benefit from many homemade fertilizers.  If you take care when you harvest your lettuce and leave enough leaf surface, it will grow back several times (possibly indefinitely, provided it has enough light, water, and nutrients.)  a $.99 cent packet of seeds can save you big money on salad greens in the food desert!

Tuesday, May 11, 2010

The Food Desert Project - Easy Apple-butter Almond Tart

When I first saw this post on Smitten Kitchen (via David Lebovitz, another blogger I follow, who got his inspiration from the Wednesday Chef, who got it...you get the idea) I immediately thought of my Food Desert project.  After all, any food desert is going to have jam or jelly, and I really liked the easy, no-roll tart shell.  I wanted to tweak it a bit, though - after all, if we're going to have dessert in the Food Desert, it would be nice if it offered us some nutrition as well as a tasty, relatively easy snack - btw, if you're looking at the length of this post and thinking "Easy? What is she thinking?" just try it out: it's much harder to describe than it is to do.  Nutrition Information.*

So I did a bit of tweaking to the recipe - most notably, I filled mine with homemade no-sugar-added apple butter - a recipe that concentrates the nutrients in applesauce and sweetens itself as the natural sugars caramelize.  This meant that the tart shell needed to take on a bit more flavor, and as I wasn't certain that almond extract was going to be readily available in the food desert, I subbed out the cornmeal and some of the flour for almond meal - easy to make from packaged almonds.  I also took out a tablespoon of butter just to make it a single stick, added back half of the egg white, and I changed to brown sugar...'cause I like it!  The resulting tart has a terrific flavor: sweet from the brown sugar, tart from the apple butter, with a wonderful floral quality from the almonds.

First of all, the apple butter:  you may as well make a lot of it, it lasts nearly forever.  (I decided not to add spices, but traditionally apple butter is flavored with cinnamon, nutmeg and cloves; if you want that, add it in the first step.)  Simply pour two 24-ounce jars of applesauce into a slow cooker, cover it  and cook on low, scraping down the sides occasionally, for 8-12 hours: the applesauce should change color to a rich brown.  Remove it from the cooker and allow it to cool a bit, then toss it in the blender and blend until smooth.  From the blender, usually I put it on the stove in a deep pot on low heat, with the lid on slightly askew (it spits; there is a fair amount of cleanup involved here but the slow cooker doesn't allow for the evaporation you want) until the apple butter reduced to half of its initial volume.  It should have a silky texture and the color of a rich, deep, caramel sauce.  This step can be completed several days in advance; store the apple butter in a sealed container for up to two weeks in the fridge, or indefinitely in the freezer.

To make almond meal from whole almonds - it's a good idea to freeze your almonds overnight before you grind them, and pulse them in your food processor or blender gently, as this will help prevent it from turning to almond butter.  You will need approximately 1/4 lb, or 4 ounces of almonds to make the cup of almond meal you will need for this recipe; grind in small batches and don't worry about a perfect texture - just get them as fine as you are able.

1 cup all-purpose flour
1 cup almond meal
2 teaspoons baking powder
1/2 teaspoon salt
8 tablespoons (1 stick) room-temperature butter
1/2 cup brown sugar
1 large egg, whole
1 large egg, separated
1 tsp vanilla extract
Half a recipe apple butter (above)
1 tablespoon sugar
 
Mix your dry ingredients (flour through salt) and set aside. Whip the butter and sugar together with a mixer or in a food processor.  Add the whole egg, egg yolk, and half of the remaining egg white.  Slowly mix in the dry ingredients, being careful not to overwork the dough.  Put the dough in the refrigerator for about an hour.
 
After the dough has chilled, remove about 1/3-1/2 of it, and form it into a log; put the log back in the refrigerator (or freezer.)

Butter a large (9 inch or larger; there's room for a bit of flexibility) springform pan or tart pan, and, using slightly wet hands, press the remaining dough into the bottom with your fingers (this is a great job for kids.) 


Create a slightly raised edge around the outside of your pie shell using the long side of your index finger. 


Fill the center area with the apple butter so that there is an even layer about 1/4" thick. 


Create a top shell for your tart by cutting slices of the refrigerated dough log and layering them in a spiral starting on the outer edge of your tart: don't worry about making this perfect, they rise a bit, just try to cover the filling - you can leave a space in the middle to show off your filling if you like (or if you, like me, run out of dough.) 


Beat the remaining egg white with a tablespoon of water, and thoroughly coat the top of the tart using your pastry brush.  Sprinkle with sugar.
 
Bake the tart in a 375 degree oven for 25 minutes.  Cool completely before removing from the pan; cut into 12 pieces (cut each quarter in 3.) Enjoy!


*note: as commercial apple butter is usually sweetened, I used the nutrition facts for applesauce, but doubled the amount to account for the reduction.

Sunday, May 9, 2010

Sundays with Sparky - Scrambled Eggs Super!

Happy Mother's Day to all you Moms out there - here's a little illustration of how we do what we do: 

A little knowledge can be a compelling thing: the other day as I, bleary-eyed, was about to make breakfast, Sparky popped up and said "Can I make my own breakfast, Mom? Can I make scrambled eggs? All by myself?" I saw in his eager brown eyes that he had come to the powerful realization that, not only can he probably learn to cook anything he wants to eat - but, more importantly, he who cooks is also he who decides what's for breakfast.

So of course I said "um, let me think about that, um - are you sure you don't want cereal? Is there coffee?" (Note to self: teach child to make coffee) and tried to rub the sense back into my eyes.

So, we went through the steps of making scrambled eggs - sorry, I didn't take pictures, as I was barely able to make sure I poured coffee and not raw eggs into my cup. We agreed that since things went well, he could make scrambled eggs for Daddy tomorrow so I could take pictures and post it here. I took a deep healing draught of coffee. The child is sharp as a tack; I had no chance whatsoever of him forgetting to make scrambled eggs the next day, so here they are, photos from day 2, instructions from day 1.

First, the eggs are cracked into a tall, heavy container that's not going to move on you while you mix them, and seasoned with a little salt and pepper:


(look at the mad egg crackin' skillz on that boy, I tell you - and at 7am, no less)

Then, you retrieve the tool we like to call the "egg bouncer," (linked below) a spring whisk - tailor made for this task, but useful to thorougly mix anything in a large cup. I often use the immersion blender for this task, but I didn't tell him that. With this tool, you vigorously whip the eggs by bouncing it up and down until they are lemon-colored and foamy.


Then you put some butter in a non-stick skillet and turn the heat on low. After the butter melts, dump in your eggs. Stir slowly with the spatula over low to medium-low heat, making sure you scrape down the sides and the bottom carefully.


(At this point, I said "Low and slow is the key, son - you need to cook scrambled eggs low and slow," whereupon he replied "Mom, Gary Wiviott says "Low and Slow" - you say "no guts, no glory." Smartass. Before I had any coffee.)

As long as the eggs are slowly thickening, resist the urge to turn up the heat. Continue stirring and mixing in the solids until you have a rich, creamy mass that is done to your liking.


Creamy and delicious - just like I like them.